
Child panel / Setup guide
Setup guide
Everything from buying a domain to your first customer order, in the order you'll actually do it.
Before you start
- A SMMFollows account with some balance: $3 for the panel plus money for the orders your customers will place. How to add funds.
- A domain. Any registrar; if you don't have one, a .com for your brand is the safe choice. You don't need hosting.
- Your SMMFollows API key, from your account page.
1. Point the domain at us
- Sign in to your registrar (GoDaddy, Namecheap, OVH, whichever).
- Open the domain and find Nameservers (sometimes under DNS management).
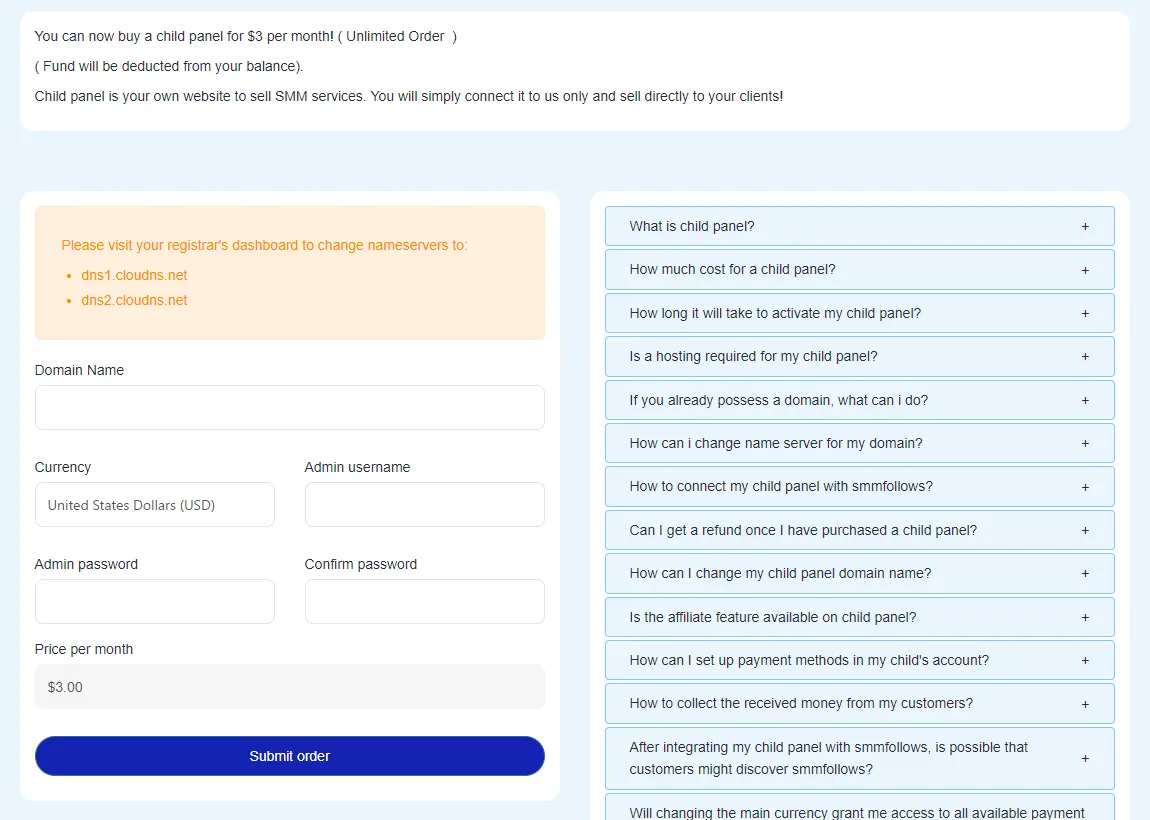
- Choose custom nameservers and enter exactly:
dns1.cloudns.netdns2.cloudns.net
- Save. Registrars take from a few minutes to a day to apply this; most are done within an hour.
2. Order the panel
- In your SMMFollows account, open Child Panel in the left menu.
- Domain name: the domain from step 1, without https or www.
- Currency: pick USD unless you have a reason not to. USD unlocks every payment gateway; another currency limits you to the one to three gateways that support it.
- Admin username and password: your login for the panel's admin area. Use a strong password; this account controls money settings.
- Click Submit order. $3 is deducted from your balance.
3. Wait for activation
The panel is set up within 3 to 6 hours, once your nameservers are live. If it's been longer than six hours, check the nameservers first (a DNS lookup site will show what the domain currently points to), then open a ticket in the Child Panel category.
4. Sign in to the admin area
Open https://yourdomain.com/admin and use the admin login from step 2. Take ten minutes to click through the menus before changing anything; everything below lives under Settings.
5. Connect SMMFollows as the provider
- Go to
yourdomain.com/admin/settings/providers. - Select SMMFollows and paste your API key.
- Save. The panel checks the key by reading your balance; if your balance appears, the connection works.
6. Import services and set prices
- From the provider's service list, import the services you want to sell. Start with 20 to 40 you've tested, not the whole catalog; you can add more any day.
- Set your price per 1,000 for each, or a percentage over our rate if you'd rather it follow our changes automatically.
- Keep our minimum and maximum. If you set a lower minimum than ours, your customer's order will be accepted by your panel and refused by us.
- Rewrite the service names and descriptions in your own words and language. Copying ours verbatim makes your panel look like a clone, to customers and to Google.
7. Add payment methods
- Go to
yourdomain.com/admin/settings/paymentsand click Add method. - Choose the gateways you have accounts with (cards, PayPal, local wallets, crypto) and enter their keys. Customers pay into these accounts directly.
- Set a minimum deposit that covers the gateway's fixed fee.
More on this in Payments.
8. Brand it
- Logo, site name, colours, favicon.
- Terms of service and a refund policy page. Write them before the first customer, not after the first dispute.
- A contact method your customers can actually reach you on.
9. Test before you announce
- Create a customer account on your own panel, as a customer would.
- Add a small amount through each payment method you enabled.
- Place one cheap order (views on your own post). Check that it appears in your SMMFollows account's Orders page within a minute and that the status flows back to your panel.
- Open a ticket on your own panel to see what your customers will see.
Go-live checklist
- SMMFollows balance covers at least a week of expected orders.
- Every listed service tested at least once.
- Minimums equal to or above ours.
- Terms, refund policy and contact page published.
- Your API key is nowhere but the provider settings.
Later changes, such as moving to a new domain (allowed once) or adding a second admin with limited access, are handled by ticket in the Child Panel category.
Ready?
Order from the Child panel page of your SMMFollows account.